


Employee ID cards are a crucial aspect of any organization’s security and identification system. Printing these cards efficiently and securely is essential to maintain a smooth workflow and ensure the safety of the workplace. In this guide, we will walk you through the step-by-step procedure of printing employee ID cards using the Zebra ZC300 Card Printer.
Step 1: Gather Necessary Materials
Before you start the ID card printing process, make sure you have all the required materials on hand:
- Zebra ZC300 Card Printer
- Blank PVC cards compatible with Zebra ZC300
- Card Design Software (PESONA Card or Zebra CardStudio)
- Computer/Laptop with USB or Ethernet connectivity
- Printer driver for Zebra ZC300

Step 2: Design the ID Card
Use a reliable design software like PESONA Card to create an appealing and informative ID card layout. Include essential details such as the employee’s name, photo, job title, and company logo. Ensure that the design complies with your organization’s branding guidelines.
Step 3: Install Printer Driver
Download and install the printer driver. Simply follow the step-by-step instructions when prompted. The printer driver is essential for your computer to communicate with the Zebra ZC300 printer. You can find the necessary drivers on the official Zebra website.
Step 4: Connect the Zebra ZC300 to Your Computer
Ensure that the Zebra ZC300 Card Printer is properly connected to your computer either via USB or Ethernet. Make sure the printer is turned on and recognized by your system.
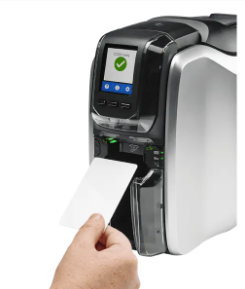
Step 5: Load Blank Cards
Open the card input hopper and load blank ID cards into the printer. Adjust the card guides to ensure proper alignment. Close the input hopper securely.
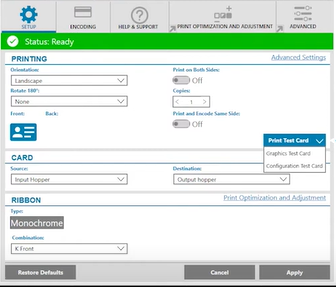
Step 6: Adjust Printer Settings
Access the printer settings through the control panel or the printer software on your computer. Configure settings such as print quality, color preferences, and card thickness to match your ID card requirements.
Step 7: Print the ID Cards
Once the design and settings are in place, initiate the printing process. Verify that the information on the preview aligns correctly with the card layout. If everything looks good, proceed with printing the employee ID cards.
Step 8: Monitor Printing Progress
Keep an eye on the printing process to address any potential issues promptly. The Zebra ZC300 Card Printer provides a user-friendly interface for monitoring the print status.
Step 9: Collect Printed ID Cards
Once the printing is complete, collect the freshly printed employee ID cards from the output hopper. Ensure that the cards are properly stacked and free from any printing defects.
Step 10: Quality Check
Before distributing the ID cards, perform a thorough quality check to ensure accuracy and clarity. Verify that all the information on the card is correct and matches the design.
Printing employee ID cards with the Zebra ZC300 Card Printer is a straightforward process when following these steps. By adhering to these guidelines, you can streamline your ID card printing workflow, enhance security, and ensure that your employees have professionally crafted identification cards. Invest the time in setting up the printer correctly, and you’ll have a reliable system for producing high-quality ID cards for your organization.
